Create Taxonomy from Template.
Creating a Taxonomy from a Template
Users can create a taxonomy using an existing taxonomy template. Before building a taxonomy, ensure that the template is created, and the advertiser is assigned to the taxonomy template.
Once the taxonomy template is ready, users can follow the steps below to navigate to the "Create Taxonomy" page.

Steps to Access the "Create Taxonomy" Page
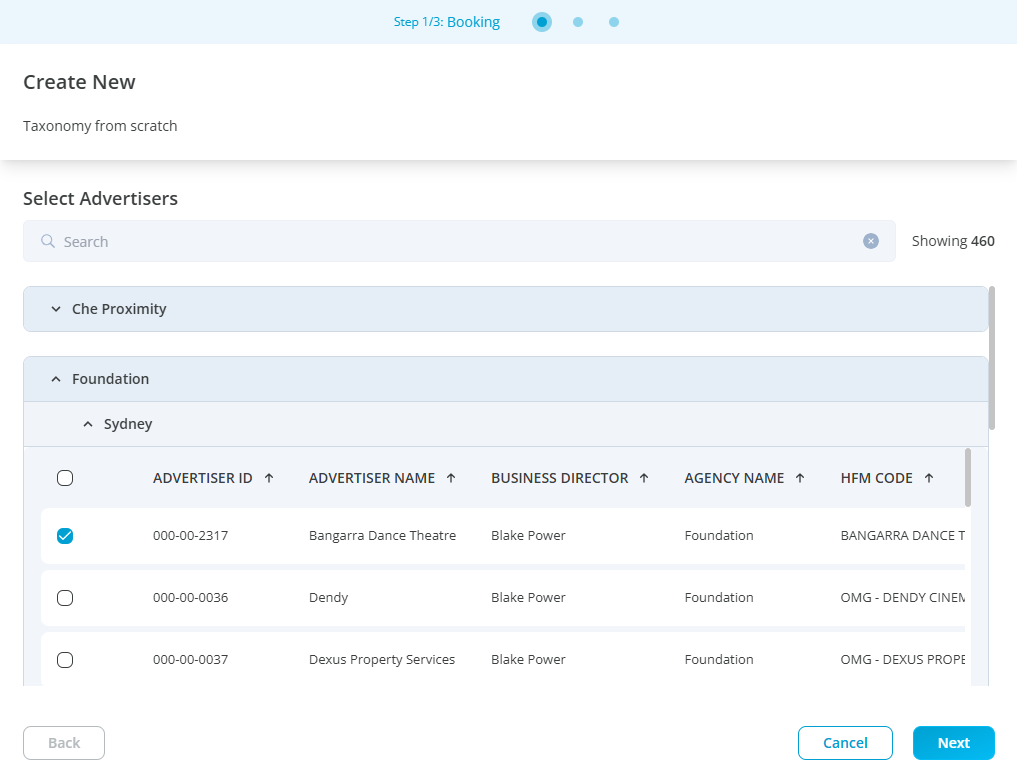
Click the “Create Taxonomy” button on the taxonomy listing page.
Select the advertiser for whom you’re creating the taxonomy. To use a template, ensure the advertiser's name matches the one used when the template was created.
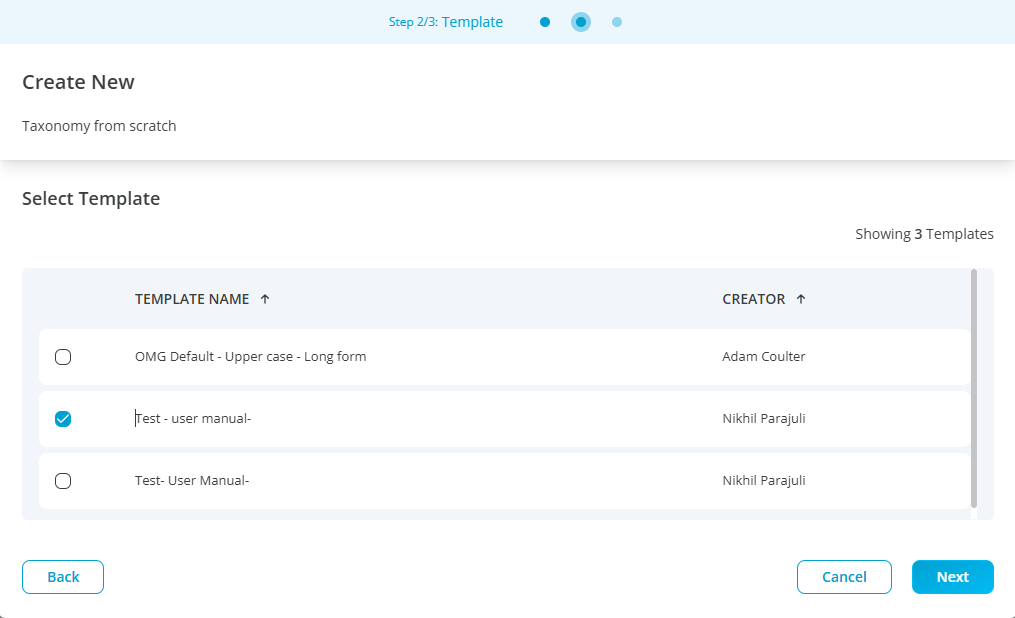
After selecting the advertiser, a popup will display all the templates assigned to that advertiser.
Choose the template you want to use by selecting the checkbox next to it. Note: You can only select one template at a time.
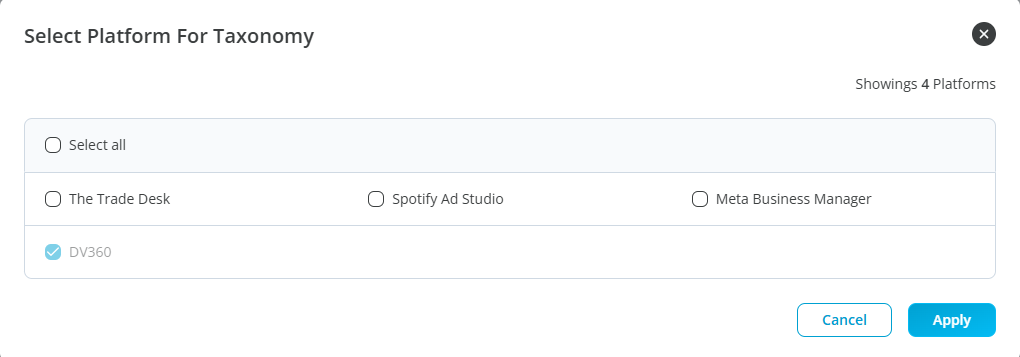
Once the template is selected, click "Next." A list of platforms will appear — these are the platforms you selected when creating the taxonomy template.
Select one or more platforms to include in the taxonomy.
After choosing the platforms, click “Apply.” This will take you to the "Create Taxonomy" page.

Create Taxonomy
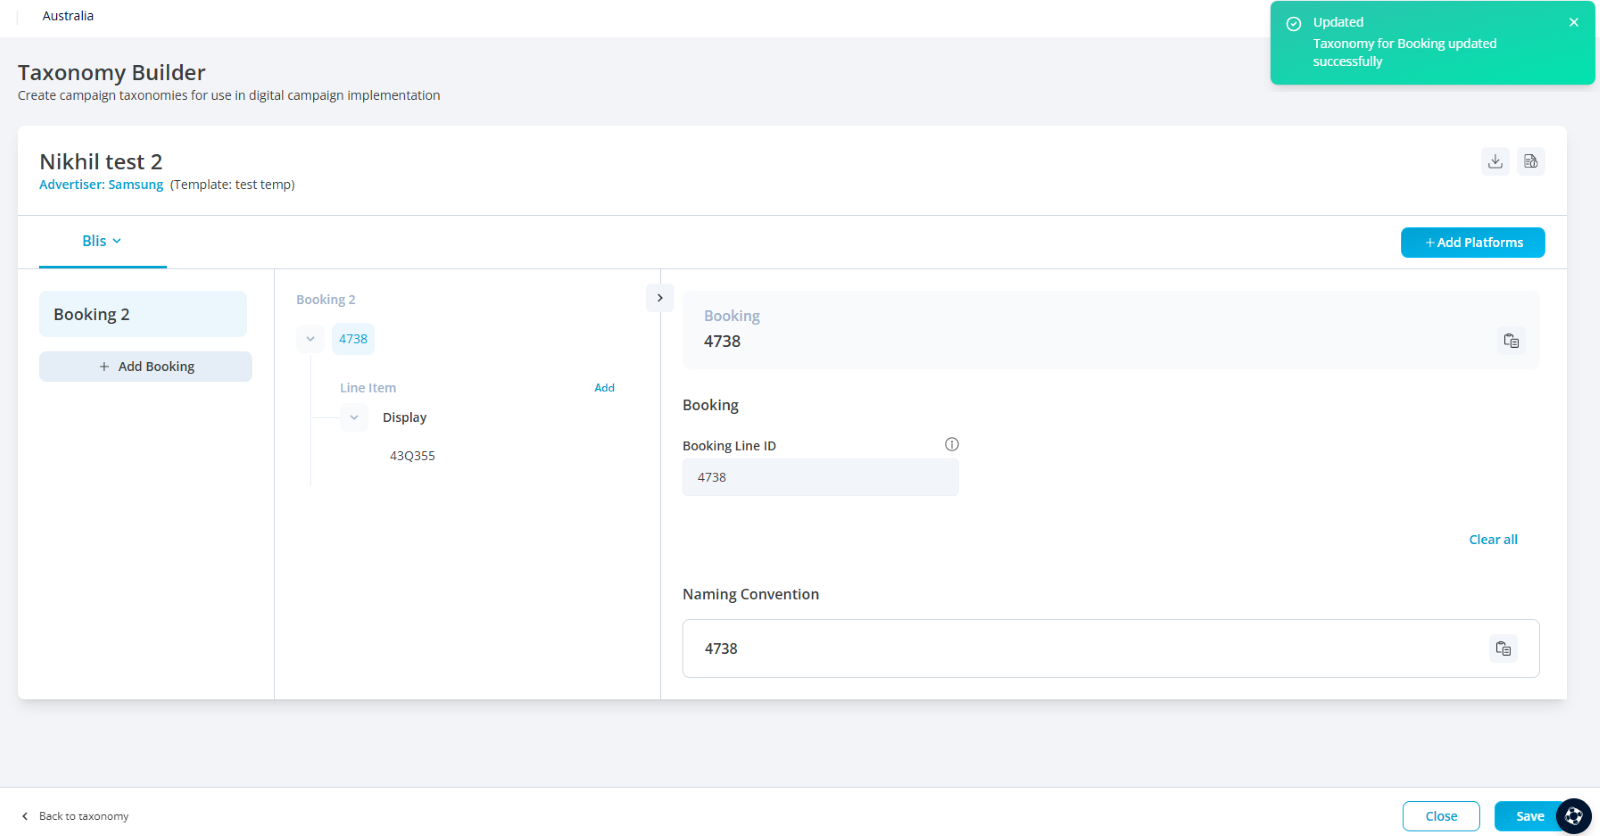
After selecting the template, advertiser, and platforms, the user will be directed to the "Create Taxonomy" page, where they can fill in the required details to create the taxonomy.
At the top of the page, you'll see a text field labelled "Taxonomy Name". Enter the name for your taxonomy in this field.
Just below the Taxonomy Name field, you'll find a section labelled "Advertiser," which displays the name of the advertiser for whom the taxonomy is being created.
Next to the "Advertiser" section, there's a "Taxonomy Template" section that shows the name of the template you’ve applied for creating the taxonomy.
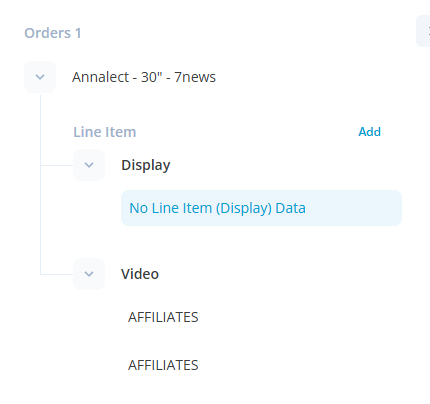
On the left panel, you’ll see a vertical list of campaigns, labelled as "Campaign 1," "Campaign 2," "Campaign 3," and so on. You can click on each campaign to view and edit its details.
At the bottom of the left panel, you'll find an "Add Campaign" button. Clicking this will allow you to add new campaigns to the taxonomy.
Upon selecting a campaign, the main panel will display the details of that campaign, such as the campaign name and line items.
The fields required for adding insertion orders or line items will be pre-populated based on the template you selected while building the taxonomy.
Adding Campaigns
To add a campaign to the taxonomy, click the “Add Campaign” icon located at the left-hand corner of the page.
After selecting a campaign, its details will be displayed on the right-hand side of the campaign list.
The "Insertion Order" or "Line Item" buttons will remain disabled until the user selects the advertiser and saves the campaign.
Once the campaign is saved, the option to enter an insertion order will become available on the right-hand side of the screen.
Line items can only be added after the insertion order has been saved.
Similarly, users can only add another line item after saving the first one.
A campaign will be successfully created only after saving both the insertion order and the required line items.
When hovering over a selected campaign, options to duplicate or delete the campaign will appear.
Clicking "Duplicate" will create a copy of the selected campaign.
Clicking "Delete" will prompt a confirmation popup asking, “Are you sure you want to delete the selected campaign?” If "Yes" is clicked, the campaign will be deleted, and the user will receive a confirmation message in the top-right corner of the screen. 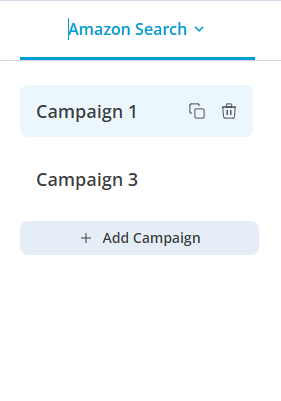
Adding platforms
Based on the taxonomy template a user can also add the platform at any time while creating the taxonomy.
To Add a platform while creating a taxonomy a user should click on blue button called “Add platform” located on top right corner of the page.
Upon clicking on “Add platform” a pop up will open with checkbox for a user's to select the list of platforms
After selecting user can click on ‘Apply’ button inside the popup to add platform in the taxonomy.

Adding Insertion Order
The blue “Add” button next to the "Insertion Order" field will only become active once the campaign is saved.
After clicking "Add," users will be able to select the insertion order from a dropdown labelled "Agency." Please note that the insertion order fields are based on the taxonomy template created by the user. For example, if the template included "Ad Group," that field would have appeared as the insertion order.
The available insertion order options will depend on the fields added in the template. For example, if the template included "Agency," "Asset Type," and "Publisher," and all three are marked as mandatory, the user will need to complete all three fields before the "Save" button is activated.
The selected insertion order will be displayed in both the "Insertion Order" and "Naming Convention" sections at the top and bottom of the right-hand panel.
After filling in all required details, click "Save" to save the insertion order. Once saved, users will be able to edit or add line items.
A toast message will appear confirming the update: "Taxonomy for insertion order updated successfully."

Adding Line Item by Selecting Media Type
The “Add” button next to the "Line Item" field will only become active once the insertion order is saved.
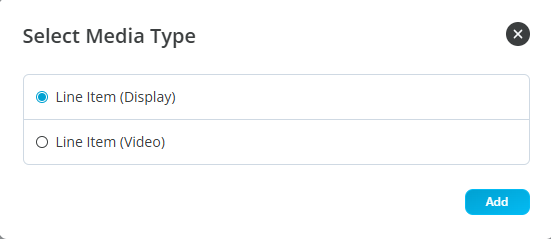
After clicking “Add,” a popup will appear prompting the user to select a media type.
The user can select only one media type at a time.
Once a media type is selected, the user can click the blue “Add” button to confirm their selection.
There are five media types available: Audio, Display, OOH, Video, and YouTube.
After adding a media type, a string will be created under the "Line Item" to reflect the selected media type.
Only two-line items (Display and Video) can be added for all media types except for OOH, where users can add up to four-line items.
After selecting a media type, a window will appear on the right panel, allowing the user to build a string by entering the necessary details for the chosen media type.
Building String / Naming Convention
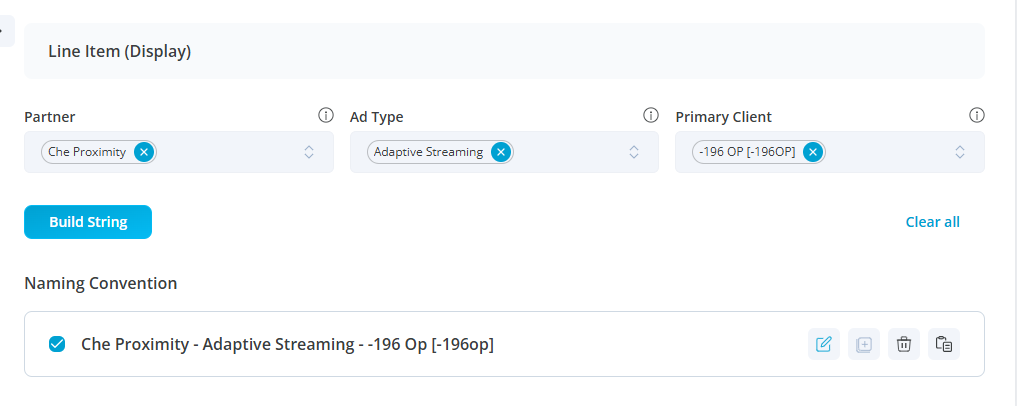
Once the media type is selected, users can enter the details for the chosen media type in the right panel of the page.
After selecting an agency from the dropdown, users can build the string by filling in the details from the dropdown and clicking the blue “Build String” button.
Once the string is built, it will appear under the "Naming Convention" section, with a checkbox next to it. This allows users to select and make changes such as edit, duplicate, delete, or copy.
The naming convention can only be edited without saving, but it must be saved before deleting or duplicating.
If users select one or multiple naming conventions and make changes from the dropdown, the changes will apply to all selected naming conventions.
Users must select and save the naming convention before they can successfully add a line item.
Once a line item is added, a toast message will appear, saying: “Taxonomy for line item < > updated successfully.”
A maximum of two insertion orders can be added to a single campaign, and only two-line items can be added for all media types except OOH. For OOH, users can add up to four media lines.
After adding an insertion order and line item, users can save the campaign by clicking the blue “Save” icon located at the bottom-right corner of the page.
A toast message will appear confirming the update: “Taxonomy for line item < > updated successfully.”
Finalize taxonomy creation
Once the user has created a campaign, added insertion order and line item in the taxonomy then user will be able to save the taxonomy, A confirmation message “Taxonomy for <Campaign name> updated successfully”, this created taxonomy will be saved on taxonomy listing page.